Bikram Yoga Poses – 26 Postures / Asanas In Great Detail
Bikram Yoga Poses 19 through 26:
19. Floor Bow Pose: Dhanurasana
Purposes and Benefits:
– Works entire spine
– Boosts circulation to heart and lungs
– Improves oxygen intake by opening rib cage; this enables maximum expansion of lungs
– Upgrades functioning of spleen, kidneys, liver, and small and large intestines by massaging abdomen
– Enhances digestion
– Opens shoulder joint
– Helps correct posture
– Develops internal balance and harmony
– Invigorates mental focus and perseverance
– Betters flexibility of deltoid, latissimus, scapula, and trapezius muscles
– Stretches hip flexors and psoas muscle
– Relieves backaches by invigorating entire spine
– Revitalizes all spinal nerves by increasing circulation to all of spine
– Strengthens abdominal muscles, hips, thighs, and upper arms
How to Do:
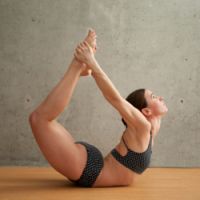
- Lie on belly, bend knees, reach back, and grab outside of each foot 2 inches below toes
- Keep feet and knees together as close as possible
- Ensure the following: Wrists have not twisted downward; Wrists remain straight by grabbing; feet with fingers, not palms; Hips aren’t tilted to 1 side
- Inhale deeply and simultaneously kick back into hands and lift thighs and upper body away from floor
- For more power, push hips and pelvis into floor before lifting legs up and back
- Release shoulders back as you lift torso
- Roll body weight forward to balance on middle of belly
- Use inner-thigh strength to keep knees and feet 6 inches apart
- If needed, avoid kicking legs up too high
- Flex or point toes toward mirror, not ceiling
- Work toward these goals: Relax neck and drop head back as much as possible; Look for toes and use equal strength in both legs to kick
- Hold pose while doing 80-20 breathing for 20 seconds
- Slowly lower torso and legs to floor
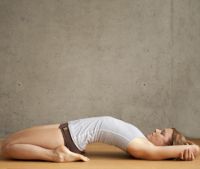 20. Fixed Firm Pose: Supta Vajrasana
Purposes and Benefits:
- Stretches into diaphragm and hip joints
- Helps cure gout, rheumatism, and sciatica in legs
- Heals and improves weak or injured knees
- Lubricates and increases circulation to joints
- Relieves lower back pain
- Tones thighs and calf muscles
- Lengthens and invigorates abdominal muscles
- Strengthens and enhances flexibility of ankles, knees, and lower back
How to Do:
(NOTE: Experiencing difficulty sitting on your heels is completely normal.)
- Start by sitting between heels with feet facing up and knees together
- If knees feel sharp pain, separate them a bit, but ensure that feet are hugging sides of hips
- Keep knees on floor throughout pose by doing these: Spread knees as much as you need to avoid straining knees; If needed, refrain from lowering your back all the way; Use hands to support body weight
- Place hands on soles of feet with fingers facing forward
- Lower back 1 elbow at a time, and then look back and let top of head drop back
- If going all the way down, get back bend by lifting chest up and dropping head back before touching head to floor
- Slowly put shoulders down onto floor as you slide elbows out
- Rest upper back on floor
- Raise arms overhead and latch onto opposite elbows
- Push arms and shoulders down and then bring them flat against floor
- Tuck chin into chest, press back with arms, and lift ribs up to feel chest stretch
- Simultaneously ground knees and feel the stretch along stomach, hip flexors, front thighs and knees
- Relax more deeply into pose by breathing, bringing knees closer together on floor, and pressing buttocks into floor
- Remember to avoid letting knees lift away from floor
- Hold pose for 20 seconds while breathing
- Exit pose slowly by using 1 elbow at a time and ensure that head is last thing to move up
- For advanced yogis, walk shoulders down toward hips and touch knees together
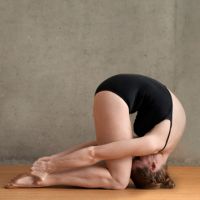
 21. Half Tortoise Pose: Ardha Kurmasana
Purposes and Benefits:
- Aids in relaxing body and mind
- Helps relieve digestion problems and constipation
- Assists in regulating sleep-wake cycle by stimulating pituitary gland
- Stretches spine, hips, and gluteal muscles
- Increases flexibility in hips
- Boosts blood circulation to brain
- Extends lower part of lungs and aids in augmenting lung capacity
- Strengthens abdomen
- Tones thighs
- Improves flexibility of deltoids, latissimus dorsi muscles, scapula, and triceps
How to Do:
(NOTE: If you feel tightness in the hips or lower back, you may need more time before you can relax in this pose.)
- Enter kneeling position: sit on heels with feet and knees together
- Raise arms above head and bring palms together with thumbs crossed
- Maintain straightened arms and spine throughout pose
- Inhale while stretching up
- Exhale slowly while bending forward in a straight line that spans distance between tailbone and fingertips
- Stretch forward all the way until forehead and sides of hands touch floor
- Engage arms and straighten elbows so that wrists, elbows, and triceps lift away from floor
- Keep sliding fingertips forward
- To deeply stretch spine, do these simultaneously: Reach buttocks back to heels; Keep using abdominal muscles (Eventually, buttocks will touch heels throughout pose)
- With arms stretching forward and hips reaching back into heels, bring chin forward and away from chest
- Relax shoulders, breathe, and feel the deep stretch along your back
- Hold pose for 20 seconds
- Exit pose slowly by moving hips back toward heels and by maintaining straightened arms and spine
- When moving in and out of pose, use abdominal muscles to avoid rounding and buckling spine
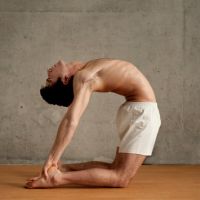 22. Camel Pose: Ustrasana
Purposes and Benefits:
- Relieves back problems by compressing spine
- Stimulates nervous system
- Improves neck flexion
- Flushes blood through kidneys
- Promotes elimination of toxins
- Opens shoulders, rib cage, lungs, and digestive system
- Strengthens back and shoulder muscles
- Invigorates and improves flexibility of neck and spine–especially thoracic spine
- Extends throat, thyroid gland, and parathyroid glands
- Helps cure constipation by stretching abdominal organs
- Slims abdomen and waistline
How to Do:
(NOTE: If you feel dizzy during this pose, keep pushing your hips forward and remember to breathe. The backward bend causes a change in blood pressure, which can result in dizziness.)
- Start with knees on floor and maintain 6 inches of space between knees and feet
- Support spine by placing hands on back of hips with fingers pointing down
- Keep elbows drawing in towards one another and let shoulders roll back
- Inhale while lifting chest, and exhale while dropping head back
- Inhale again while lifting chest, use hands to support spine, and exhale while arching torso back farther
- Keep chest lifted throughout pose to minimize compression in lower back
- Ensure that hips are forward and lined up above knees by doing these: Bring right hand down to grab right heel and left hand down to grab left heel; Put thumbs on outside of feet and place fingers on soles
- Maintain tight grip on feet so you can push hips forward
- If hips collapse back and you sink into spine as you grab heels, keep hands on hips and keep lifting chest
- Keep arching spine back and work hips forward while lengthening tailbone down toward floor
- Continue lifting chest to ensure that body weight hasn’t sunk back into heels and hands
- If you’re feeling anxiety/fear, relax and breathe; breathing can also help you go more deeply into pose
- (NOTE: If you have high blood pressure or any heart condition, please do the next step, which is holding the pose, for only 5 seconds. With more practice, you can gradually ease into the hold and increase the time.)
- Breathe deeply as you hold pose for 20 seconds, and allow heart to open and lift
- Reverse out of pose by bringing right hand to right hip, and then bring left hand to left hip
- Press knees down and use abdominal strength to lift and straighten up spine
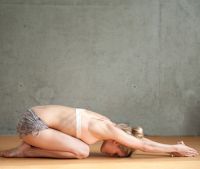
 23. Rabbit Pose: Sasangasana
Purposes and Benefits:
- Balances out spine and releases tension after doing previous pose–Camel pose (#22)
- Prepares body to do final 2 poses (#24 and #25) by rounding out body
- Improves digestion
- Regulates metabolism
- Alleviates common cold, chronic tonsillitis, and sinus problems
- Nourishes nervous system by maximally extending spine
- Compresses and nourishes parathyroid and thyroid glands
- Enhances mobility and elasticity of back muscles and spine
- Improves flexibility of scapula and trapezius
How to Do:
- Kneel on a towel that extends back past toes
- Reach back and fold edges of towel over heels
- Grab heels and towel together
- Maintain firm grip with thumbs outside feet and with fingers on soles
- Keep chin tucked into chest
- While exhaling, begin curling torso slowly and tightly forward and inward until forehead touches knees and top of head touches floor
- If you notice a gap between forehead and knees, walk knees forward to meet forehead
- As you curl inward, lift hips into air, firmly pull on heels, and roll body forward like wheel
- Push feet firmly into floor and pull on heels with all your power to maintain about 25% of body weight on head
- Tuck chin securely into chest, engage belly to lift hips, and stretch more deeply into lower back
- Work toward these goals: Completely straighten arms; Reach upward using hips so that thighs are perpendicular to floor
- Remember to breathe normally
- Hold pose for 20 seconds
- To reverse out of pose, lower hips back toward heel, uncurl slowly, and lift chin last
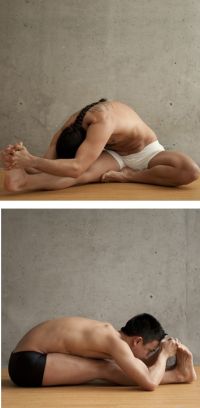 24. and 25. Head-to-Knee Pose with Stretching Pose: Janushirasana with Paschimottanasana
(Note: these are two poses grouped together)
Purposes and Benefits:
- Balances blood sugar levels and metabolism
- Nourishes kidneys and enhances kidney function
- Boosts circulation to liver, pancreas, and spleen
- Betters circulation to bowels; this advances digestion and relieves chronic diarrhea
- Improves concentration and mental endurance
- Expands solar plexus
- Enhances flexibility of ankles, knees, hip joints, and sciatic nerves
- Stretches deltoids, trapezius, and hamstrings, particularly erector femoris
- Extends lower back, especially last 5 vertebrae
- Strengthens biceps and quadriceps
How to Do:
- Face mirror and start by doing these: Extend right leg out 45 degrees; Bend left leg until left sole pushes against right inner thigh; Bring left heel up to crotch (Legs form 90 degree angle)
- Inhale, raise arms overhead, twist toward right, and stretch down over right leg
- Hold right foot with hands tightly interlaced; bend right knee if needed
- Pull toes back toward face until toes are flexed
- Tuck chin into chest and round your back until forehead touches right knee
- If needed, bend right knee to touch forehead to knee
- Otherwise, if right leg is straight, flex right foot until its heel lifts away from floor
- Begin bending elbows straight down toward floor
- Keep spine evenly aligned over right leg by rolling left shoulder and elbow down farther
- Let eyes stay open, remember to breathe, and hold pose for 10 seconds
- Repeat pose on left side by doing these: Keep left quadriceps engaged to safely extend hamstring; Engage abdominals to safely stretch lower spine;
- Extend legs out in front, and in 1 fluid movement, lie back and immediately sit up while inhaling
- Wiggle hips back, and pull back flesh of buttocks to prepare to bend torso forward with lengthened spine
- Hold big toes with first 2 fingers of each hand, and flex feet by pulling toes back
- Inhale while lifting and lengthening spine
- Exhale while stretching forward and work toward lifting heels up away from floor
- Touch forehead to toes
- Bend elbows to floor, draw in stomach, and point chest and face toward legs
- (Spine must be straight and not rounded; bend knees slightly if needed)
- If hamstrings burn and lower back feels stiff, breathe and exhale to relax muscles into deeper stretch
- Hold pose for 20 seconds
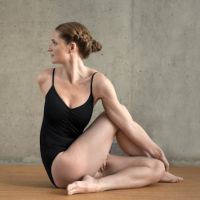 26. Spine Twisting Pose: Ardha Matsyendrasana
Purposes and Benefits:
- Creates equilibrium in spine and in left and right side of body
- Compresses and stretches spine from bottom to top
- Twists and rinses out spine
- Boosts and enhances elasticity, flexibility, circulation, and nutrition to spinal nerves, veins, and tissues
- Helps prevent slipped discs, spinal rheumatism, scoliosis, kyphosis, cervical spondylosis, and arthritis
- Relieves lower back pain
- Increases flexibility of hip joints and back
- Stretches chest, upper back, and outer thigh muscles
- Firms thighs, buttocks, and abdomen
- Strengthens abdominal muscles and buttocks
- Advances digestion and removes flatulence by rinsing out abdominal organs
- Opens shoulder joint
How to Do:
- Set up for pose by doing these: Bend left leg on floor until left heel meets side of right buttock; Bend right knee to bring right leg up and over left leg; Line right heel up to touch left knee
- Ensure that left knee and both buttocks stay on floor throughout pose
- Line right hand up behind back near tailbone to keep body weight forward and lifted throughout pose
- Inhale while stretching left arm up alongside left ear
- Exhale while drawing left arm over right knee to firmly hold left kneecap
- Inhale while lifting spine
- Exhale while turning head over right shoulder, and twist shoulders and torso toward right
- Deepen twist by doing these: Press left elbow into right knee; Reach right hand behind your back all the way around to hold left thigh or hip
- Breathe normally and work toward twisting more deeply, specifically during an exhale
- (NOTE: Keep abdominal muscles engaged to support spine, and use core strength to avoid twisting from a rounded, unsupported spine.)
- As you twist, think of lifting up
- Lift abdomen out of pelvis, and lift upper body up toward ceiling
- Work shoulders down and away from ears
- Breathe, hold pose for 20 seconds, and unwind out of pose
- Repeat this pose on your left side by twisting to your left
Once you are finished doing all the poses (or whichever you choose to do), you should finish off with the Blowing in Firm pose, which is the final breathing exercise, also known as Kapalbhati-in-Vajrasana. You’ll do this to clear your mind, remove any stale air from your lungs, improve bowel movement and oxygen flow to the body, and even help normalize your blood pressure.
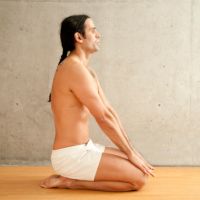 Blowing in Firm – Final Breathing Exercise: Kapalbhati-in-Vajrasana
How to Do:
- Do not underestimate this pose; focus on it as you would on any other pose.
- Keep your body firm and do not move anything at all except for your stomach.
- At the same time, make sure that your belly is relaxed and not tensed.
- During the second set of this pose, increase your breathing speed.
Summary
We hope you’ve learned everything you need to properly perform all 26 bikram yoga poses. If you still need more information, including videos and even more detailed instructions of each posture, scroll to the top of the page and choose the pose that interests you from the menu on the right. Namaste!