Balancing Stick Pose – Step by Step
The Balancing Stick pose is the 7th posture done as part of all Bikram Yoga exercises; it comes right after the Standing Bow-Pulling pose, and right before the Standing Separate-Leg Stretching Pose.
It’s original name is the Tuladandasana.
Benefits & Purposes
The balancing stick pose is relatively simple to execute even for a beginner, though it does come with its fair share of benefits, the most notable of which being a tremendous relief of any stress and tension along your entire spine. Your body posture will improve as well, since the muscles of your lower back and shoulders will be strengthened.
You’re entire circulatory system, and particularly the blood vessels in the heart itself, will be getting a tremendous workout as well, largely due to the horizontal alignment that your body will be in if you perform this posture properly. Your liver, spleen, and other vital organs will be provided with relief as well.
As the name suggest, the Balancing Stick posture improves overall balance and, as with all Bikram Yoga exercises, improves mental focus and concentration, as you will need a lot of them to sustain the position for the full duration. Your lower legs and particularly the inner muscles of your quadriceps (front of the thigh) will become stronger and will develop higher endurance.
Finally, and as a direct result of all of the above, the Balancing Stick posture will help you prevent (to an extent) heart-related diseases and conditions.
How To Perform the Balancing Stick Pose
As you can see, the pose is fairly simple and does not require incredible flexibility, such as the Dandayamana Janushirasana for example. It does, however, require a great deal of balancing. Follow these steps exactly as laid out:
- Start by lifting your arms above your head and pointing them towards the ceiling. Your arm muscles should be kept tight and your elbows locked. Interlock all your fingers while making sure to keep your index fingers pointed outwards, just like if you were pretending your hands were a gun!
- Arch your lower back slightly while pushing your hips forward.
- Take a big step forward with your right leg, immediately locking it at the knee as soon as it touches the ground (the left leg remains back in place).
- Using your left leg as a pivot point, lower your upper body forward while simultaneously lifting up your left leg. This movement must be performed very quickly (one second at most) as you want the blood to come rushing to your head.
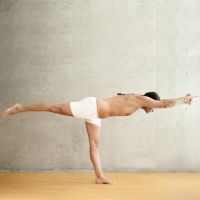
- At this point, your raised (left) leg, upper body and arms should all form a line that is perfectly parallel to the floor. If someone were to look at you from the side, you would look like the perfect letter T.
- Keep the foot of your supporting leg pointed perfectly forward, in the same direction your arms are pointing.
- Begin to stretch your body in two opposite directions – pull back with your lifted leg, and push forward with your torso and arms. While you do that, do not forget to maintain the perfect T-letter shape.
- Hold for 15 or so seconds or however long your instructor specifies, then lower your log and repeat the same procedure for the other leg.
Things to Keep in Mind
- Do not tuck your chin to your chest; keep your face parallel with the floor.
- You arms and supporting leg should remain 100% locked throughout the entire duration of the posture.
- Make sure to squeeze your head with both arms; squeeze hard, but not hard enough that your temples or ears start to hurt!
- Make sure your stomach is sucked in as you perform the posture, and that your abdominal muscles are tightened.
Balancing Stick Pose Instructional Video
Here is a video from BikramManhattan that perfectly demonstrates how this posture should be performed. Have fun, and if something isn’t clear – please ask in the comments section below. Thanks!