Standing Separate-Leg Stretching Pose
The Standing Separate-Leg Stretching Pose is the 8th out of all 26 Bikram Poses. It immediately follows the Balancing Stick pose, and comes right before the Triangle Pose.
Its original name is Dandayamana Bibhaktapada Paschimottanasana.
Benefits & Purposes
Due to the head being lowered to the ground, the Standing Separate-Leg Stretching pose will boost circulation to the brain, nasal cavity, and adrenal glands. It also decompresses the nerves in the upper-spine, helping prevent some of the symptoms associated with “sciatica.”
This posture will give your lower back a great stretch, improving the flexibility of the bottom-most vertebrae, and reducing the possibility of sustaining back injury while performing everyday tasks. Also, and as a direct result from the considerable stretch involves, it will improve the flexibility of your ankles and hip joints, but also strengthen your quadriceps and calf muscles.
Properly sustaining the position requires considerable effort, which increases the amount of calories burnt and contributes (albeit slightly) towards reduction of body fat tissue. There is also a connection between performing the Standing Separate-Leg Stretching pose and the mitigation of certain diseases related to the nervous system, hyper-acidity, and even constipation.
This posture will stimulate many of your internal organs and enhance their function by stimulating blood flow to their region, most notably the small & large intestines and the reproductive organs. Finally, there is increasing evidence to support the notion that this pose (and all other Bikram Yoga exercises in general) help reduce the side-effects of mild psychological depression.
How To Perform The Standing Separate-Leg Stretching Pose
This pose will improve your flexibility tremendously, and as such most beginners won’t be able to perform the full range of motion. Don’t worry though; it’s precisely the fact that you cannot yet perform it that makes this pose so beneficial; after all, if there was no struggle, your body would not improve.
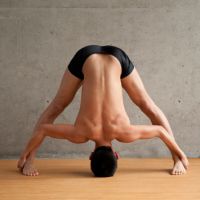
- Stand straight, with both feet as close together as possible.
- Raise both your arms above your head and towards the ceiling while keeping the inside of your palms facing each other.
- Extend your right leg sideways so that both your legs form an inverted “V” shape. The distance between both feet should be around 4-5 feet. Keep both your legs lock, and spread both your arms sideways so that they become parallel to the floor – just like if you were pretending to be an airplane 🙂
- While keeping your knees locked, move your hips slightly backwards while arching your lower back a little; you should feel a natural curve forming right above your buttocks. You’ll know you are doing this properly if you feel a slight stretch in the hamstrings.
- Keep your feet firmly on the ground, knees locked. Begin to slowly lower your torso, as if you were attempting to bring it between your legs. Beginners won’t be able to go too far down, but that’s just fine. While descending, make sure to keep your head, neck and spine in one straight line (do not tuck your chin or bend the head backwards).
- The goal is to get your torso so low that it becomes nearly perpendicular to the floor. Once you have brought the torso as low as you can, use both your hands to grab your heals from beneath (not from the back), and then attempt to pull the heals upwards with your strength, providing for an excellent whole-body stretch. Again – a beginner will likely not be able to do this; in that case, just try to grab your feet anywhere, or even touch them with the tips of your fingers.
- Hold the position for a good minute, or as long as required by your instructor.
Things to Keep in Mind
- After you lower your torso, try to shift as much of your weight onto the toes, while still maintaining your balance.
- As a beginner, do not force the movement – if you feel that you’ve reached the limits of your range of motion, do not push past it; just hold the position at just that point where you feel that it’s challenging, and you’ll improve with time. If you are feeling pain, you are going too far.
- Keep the knees locked; keep the head, neck and spine aligned in a straight line.
- All the movements should be performed slowly and under full control – “jerking” motions will likely lead to a muscle strain or even tear.
Standing Separate-Leg Stretching Pose Video
As always, here’s a great video detailing how the posture should be performed. Keep in mind that the person doing the pose in this video has years of experience, so please have realistic expectations when you get started.