The Eagle Pose – Instructions
The Eagle Pose is one of our favorites; not just in how it looks, but also due to the wide range of benefits that your body, and particularly the joints, will see. It is the third of all Bikram Yoga postures performed in a standard sessions, and comes right after the Awkward pose and before the Standing Head-to-Knee pose.
The original name of this pose is Garurasana, which literally translates to “Eagle Pose.”
Benefits & Purposes
This posture will give your joints, and particularly the twelve major ones such as the knees, elbows, ankles, wrists, hip joint and shoulder joints, a great workout, which will be appreciated by both beginners, advanced, and elderly yoga practitioners. It does a great job at warming up your body for the three upcoming poses, each of which requires your joints to be particularly flexible.
Your central nervous system will benefit from the Eagle pose as well, due to the way it stretches out the lower and upper-back area, and also due to the amount of concentration you’ll need to exhibit if you want to maintain the posture properly. As a direct result of the above, you will also notice over-time improvements in your body-balance, a stronger immune system (due to improved blood flow around the joint areas), and significantly improved mobility of your hip joint.
Finally, the Eagle pose will also strengthen a few muscle groups in your body, in particular: the trapezius muscles, the deltoids, the quadriceps (front thighs), and the hamstrings.
How To Perform The Eagle Pose
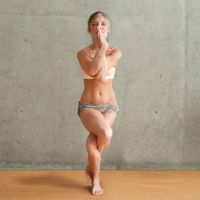
What you see above is a perfect execution of this posture.
- At first, keep both your feet close together.
- Raise both arms above your hand, and then slowly attempt to hook your right arm underneath the left one at elbow level. If you can and if your flexibility allows for it, cross your fingers together in both palms.
- Get into a half-squat position; basically lower the hips slowly as if you were about to sit down on a chair. Hold this position for a few seconds and then slowly bring your right leg over the left one and around it; your goal is to try and place your right foot on the calf muscle of your left leg. If you can’t get your foot so far behind, just get it as far as you can without over-working yourself – your flexibility will improve soon enough.
- Bring your shoulders to the back, which will open up many different joints in the shoulder area, and then push your body slightly upwards from the chest; imagine a hook being attached to your chest, and that hook is attached to a rope and is pulling you slightly upwards.
- Hold the pose for as long as your instructor specifies (or for however long you want if you are doing the session at home), go back to a natural position, and then switch – bring your left arm underneath the right arm, and bring your left foot behind the right calf.
Tips & Advice
- Many people get so caught up trying to perfect the Eagle posture that they forget to breath properly. Don’t be one of those people.
- Keep your palms at around the same height as your lips.
- Never let your palms get away from each other.
- Keep your spine straight at all times; do not hunch forward or lean backwards.
- As you improve, try to get the entire surface of your lifted foot flush with your calf; in the beginning though it’s OK if there is a gap between the two, don’t worry about it at all.
- Attempt to squeeze your legs and joints together to generate more torque, thereby opening up your joints even further.
Bikram Yoga: Eagle Pose Instructional Video
Below is a great 2 minute video demonstrating how to properly perform the Eagle posture; it goes through all the steps and provides some tips for beginners who might have some flexibility issues.