Bikram Yoga Poses – 26 Postures / Asanas In Great Detail
Bikram Yoga poses consist of 26 groups of postures (known as Asanas). By doing these yoga poses, one can exercise and invigorate all of the body by stimulating its glands, nerves, and organs and by improving circulation of oxygen throughout the body. Before you do any of these poses, please consider the following:
– The most important part of Bikram Yoga is to continuously focus on breathing calmly
– Beginners may need weeks or even years of practice before their bodies can move completely into many of the poses
– Practicing in front of a mirror is recommended because several steps involve using a mirror
– For extra safety and comfort, make sure to use a high quality Yoga mat while practicing
– The standing poses warm up the body, and the floor poses squeeze, stretch, and twist various parts of the body
– To support the spine during all twisting poses, keep the abdominal muscles engaged
– Ideally, you will perform these poses in a room with an average temperature of 107 Fahrenheit; however if this isn’t possible, a somewhat cooler room will do just fine
This article provides the names and explanations of all 26 Bikram Yoga poses, and it’s divided using the following headings (bold font) and subheadings:
- Pose number. English name of pose: Sanskrit name of pose (NOTE: The first 2 poses are grouped together, and so are poses 24 & 25.)
- Purposes and Benefits
- How to Do (how to perform each pose)
26 Bikram Yoga Poses
Before you begin doing the actual Bikram Yoga poses, start by doing the Standing Deep Breathing pose, also called the Pranayama. This will help you expand your lungs, improve detoxification of the organs, and increase mental relaxation as well as blood flow – all of these will prove very useful during your Bikram Yoga workout.
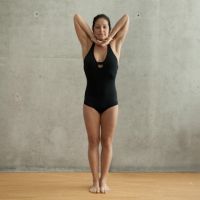 Standing Deep Breathing Pose: Pranayama
How to Do:
More detailed instructions & video here.
- Make sure to breath slowly as this will facilitate lung expansion.
- Keep your back straight all the time and do not bend backwards. This will be easier to achieve if you suck your belly in so that your rib cage protrudes a bit.
- As you exhale, tilt your head back slightly, while keeping your eyes open.
- Shoulders should be kept in line with hips. Hips should be kept forward (you’ll achieve this by slightly squeezing your buttocks).
- When exhaling, make sure to breath out completely to get rid of every bit of CO2 in your lungs.
- Finally, don’t worry if you feel a little dizzy during this pose or if you feel a slight pinch in the shoulder area – these are completely normal symptoms and indicate that you are doing things right.
Do the above pose for a few minutes, and then move on to the remaining Bikram Yoga Poses, outlined below:
Bikram Yoga Poses 1 Through 9:
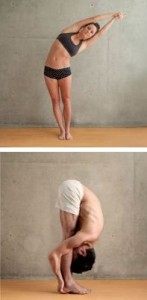 1. and 2. Half-Moon Pose with Hands-to-Feet Pose: Ardha Chandrasana with Pada Hastasana (NOTE: These are 2 poses.)
Purposes and Benefits:
- Provides quick energy and vitality for your practice session
- Corrects any issues with posture or with lower-back pain
- Strengthens thighs, calves, and all of body’s central muscles
- Exercises circulatory, glandular, pancreatic, muscular, respiratory, renal, and skeletal systems
- Improves bowel activity by toning abdominal organs and spinal nerves
- Firms and trims abdomen, buttocks, hips, and waistline
- Lessens anxiety and mental stress
- Increases spinal flexibility
How to Do:
More detailed instructions & video here
- Lock arms and fully engage arm muscles
- Straighten body towards ceiling
- While bending backwards, evenly distribute this bend over all of your spine
- During Hands-to-Feet pose, glue body to legs and move elbows as close to each other as possible behind calf muscles
- Lift hips up towards ceiling while moving face increasingly further down your shins
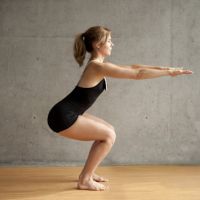
Purposes and Benefits:
- Continues warming up body for all other yoga poses
- Heals chronically cold feet
- Circulates fresh blood to knees and ankles
- Alleviates rheumatism and arthritis in legs
- Strengthens and firms all muscles of legs and upper arms
- Increases hip flexibility and relieves muscular aches and cramps
- Helps to cure slipped discs and other lower-spine problems
How to Do:
More detailed instructions & video here
- Maintain 6-inch gap between knees and hands while keeping them parallel to floor
- Ensure that shoulders stay down by relaxing them throughout all 3 stages of this pose
- Ease exhaustion by focusing on stretching arms out
- Keep fingers together
- Breathe at normal pace
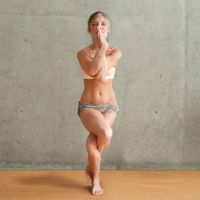
Purposes and Benefits:
- Works into 12 major joints of body
- Warms body and readies it for next 3 poses
- Promotes health of central nervous system
- Enhances lymphatic functions
- Improves balance, hip-joint mobility, and immune system
- Strengthens deltoid, trapezius, and legs
- Reduces varicose veins
How to Do:
More detailed instructions & video here.
- Remember to breathe
- Pull in stomach and keep it away from thighs
- Position fingers below nose
- Keep palms together
- Enter sitting posture and maintain straight spine
- Squeeze knees and thighs together in all areas that you feel contact between them to increase tourniquet effect
- Focus body weight onto heel of standing foot and eventually eliminate gap between wrapped foot and back of standing leg
 5. Standing Head-to-Knee Pose: Dandayamana Janushirasana
Purposes and Benefits:
- Uses all major muscle groups
- Exercises digestive and reproductive organs
- Improves concentration and mental strength
- Unifies body and mind
- Tightens abdominal and thigh muscles
- Lessens/mitigates diabetic disorders
- Squeezes and flushes out ovaries, uterus, and internal abdominal organs, such as gall bladder, pancreas, and spleen
- Increases flexibility of sciatic nerves
- Strengthens the following: Tendons, hamstrings, and biceps of thigh muscles; Biceps, triceps, deltoids, trapezius, back muscles, latissimus dorsi, and scapula
How to Do:
More detailed instructions & video here.
- Evenly distribute weight over 4 points of standing foot
- Lock knee of standing leg
- Maintain tight grip with all 10 fingers
- Keep non-standing leg parallel to floor
- Suck in stomach and contract abdominal muscles
- Move foot toward face and past perpendicular position
- Touch elbows to calf muscle
- Tuck chin to chest, round spine, and touch forehead to knee
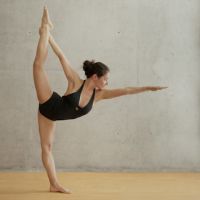 6. Standing Bow-Pulling Pose: Dandayamana Dhanurasana
Purposes and Benefits:
- Exemplifies “tourniquet” effect in Bikram Yoga because this pose transfers circulation from 1 side of body to other side and then equalizes circulation
- Improves flexibility and strength of most of body’s muscles
- Stimulates cardiovascular system
- Increases circulation to heart and lungs
- Opens shoulder joints and diaphragm
- Eases frozen-shoulder conditions
- Enhances spinal elasticity
- Firms abdominal wall and upper thighs
- Tightens buttocks, hips, and upper arms
- Increases elasticity and size of lungs and rib cage
- Improves flexibility and strength of lower spine
- Reduces abdominal fat
How to Do:
More detailed instructions & Video here
- Grab ankle joint and maintain firm grip using all 5 fingers
- Bring knees together
- Raise arm up and stretch it toward ceiling
- Keep knee locked
- Charge body forward
- Kick and then feel spine arching backward
- Visualize foot steadily moving past top of head
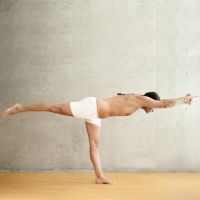 7. Balancing Stick Pose: Tuladandasana
Purposes and Benefits:
- Provides full spinal stress relief
- Increases cardiovascular circulation, especially to blood vessels of heart
- Refines control and balance by enhancing physical and mental powers
- Improves posture
- Gives many benefits for legs that standing head-to-knee pose also gives
- Relieves spinal stress
- Reduces varicose veins
- Exercises liver, pancreas, spleen, and circulatory and nervous systems
- May help to clear blocked arteries and to prevent cardiac problems
How to Do:
More detailed instructions & video here.
- Keep knees locked and stomach in
- Point toes of non-standing foot
- Look for front foot in mirror
- Press arms against ears and remove any arm-to-ear gaps
- Stretch body toward both sides as though playing tug of war
 8. Standing Separate-Leg Stretching Pose: Dandayamana Bibhaktapada Paschimottanasana
Purposes and Benefits:
- Boosts circulation to brain and to adrenal glands
- Cures and prevents sciatica
- Increases flexibility of bottom 5 vertebrae
- Improves functioning of most internal abdominal organs, especially small and large intestines
- Enhances flexibility and muscle tone of ankles, calves, thighs, pelvis, and hip joints
- Mitigates diseases of nervous system and effects of constipation, diabetes, and hyperacidity
- Reduces abdominal obesity
- Releases lower back
- Exercises adrenal, muscular, and reproductive systems
- May alleviate depression
How to Do:
More detailed instructions & Video here.
- Take a step (4 feet or more) to your right (wider stance = easier stretch)
- Move feet increasingly closer (NOTE: if touching your forehead to the floor between your legs is easy, then use small steps; the higher the difficulty, the larger your steps)
- Keep spine straight for as long as possible
- Grab bottom of heels when they’re within reach, and then use arms to pull yourself farther down
 9. Triangle Pose: Trikanasana
Purposes and Benefits:
- Stretches both sides of body and revitalizes it
- Improves every joint, muscle, tendon, and internal organ
- Opens and increases flexibility of hip joints
- Provides cardiovascular exercise
- Reduces saddle bags
- Helps kidneys, thyroid glands, and adrenal glands
- Opens shoulder joint and alleviates frozen shoulder
- Strengthens and tones buttocks and legs
- Aids in regulating hormonal levels
- Works all muscle groups simultaneously
- Finally, this Bikram Yoga pose Mitigates effects of appendicitis, colitis, spondylitis, constipation, low blood pressure, and menstrual disorders
How to Do:
More detailed instructions & Video here.
- Stretch one arm up and other one down
- Touch chin exactly to shoulder
- Keep shoulders down
- Push both hips toward mirror
- Touch lowered fingers between 1st toe and 2nd toe
- Keep torso flat and in a straight line as you stretch arm toward ceiling
- Avoid letting rib cage stick out
- Remember to breathe while engaging in positive thoughts and emotions
- Keep hips down, sit down, and prevent hips from moving up