Bikram Yoga Poses – 26 Postures / Asanas In Great Detail
Bikram Yoga Poses 10 through 18:
10. Standing Separate-Leg Head-to-Knee Pose: Dandayamana Bibhaktapada Janushirasana
Purposes and Benefits:
– Compresses belly and throat to flush out and stimulate abdominal organ
– Alleviates diabetic disorders
– Balances levels of blood suga
– Aids immune system and metabolic functions by stimulating thyroid
– Helps regulate pancreas and revitalizes kidneys
– Works digestive, endocrine, and reproductive systems
– Enhances flexibility of calves, hamstrings, sciatic nerves, and spine
– Strengthens abdominal muscles and legs (particularly calves and quadriceps)
– Slims belly, buttocks, hips, and waistline
– Invigorates and stretches shoulders (especially deltoids and trapezius)
How to Do:
More detailed instructions & Video here.
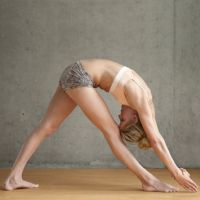
- Remember to breathe throughout pose
- Bring feet together and raise arms above head
- Form steeple grip with hands and move right leg 4 feet toward right
- Turn right foot out 90 degrees and do same with torso, hips, arms, and head
- Rotate left foot in about 45 degrees to keep hips squared forward
- Tuck chin into chest and maintain straightened arms and legs
- Round down from hips until forehead touches right knee
- If hamstrings or spine is tight, bend right leg until forehead touches knee
- Keep arms and left leg straight, and if you need balance, separate hands on floor
- Engage abdominal muscles, round spine by lifting belly, and straighten right leg
- Work toward these 3 goals: Keep forehead on right knee; Straighten legs; Bring hands together into prayer position
- Align hips by twisting them rightward to square hips to floor
- Keep eyes open and ensure chin is tucked tightly into chest
- End pose by doing these: Keep arms straight and next to ears; Engage abdominal muscles; Round up slowly
- Repeat on left side by turning once to face forward and then turning again to face left leg
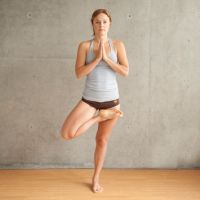 11. Tree Pose: Tadasana
Purposes and Benefits:
- Prepares body for Locust pose (#17) when combined with Toe Stand pose (#12)
- Relieves lower-back pain
- Releases tension in belly
- Prevents hernia
- Stretches spine and adductors along inner thigh
- Improves balance and posture
- Increases flexibility of ankles, knees, and hip joints
- Enhances mobility of knees and hip
- Helps correct posture
- Invigorates Internal oblique muscles and leg muscles–particularly calves and quadriceps
How to Do:
- Choose a point for visual focus
- Concentrate and relax by deepening breath
- Balance on left leg
- Use right hand to hold right foot up in front of left upper thigh
- Keep sole of right foot facing toward ceiling
- Tighten buttocks, straighten spine, and ensure the following:
- Tailbone is lengthening down
- Ribs are drawn in
- Shoulders are moving back rather than rounding forward
- Open right hip and work right knee down and back until knees are in 1 line
- If right foot remains above left thigh, bring hands into prayer in front of chest
- Prevent right foot from slipping by pushing hips forward and bringing right knee back
- Hold pose for 10 seconds
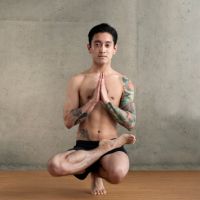 12. Toe Stand Pose: Padangustasana
Purposes and Benefits:
- Aids in curing gout and rheumatism
- Helps relieve arthritis in hips and in all leg joints
- Strengthens joints, stomach muscle, biceps, triceps, and shoulders
- Invigorates ankles, feet, and knees–especially effective for curing gout and rheumatism
- Builds balance, concentration, core strength, focus, and patience
- Prepares body for relaxation and stillness of next pose
How to Do:
- Remember to breathe
- Begin in Tree pose and then hinge forward from hips while keeping standing leg straight
- Distribute weight evenly through thighs, calves, and all areas of standing foot before descending
- Reach for floor and transfer body weight to hands so that knees are protected as standing leg starts to bend
- Keep standing leg locked, bend down to ground, and focus on a point on floor in front of you
- Once you’re sitting on heel, walk hands back by hips, lift chest, and straighten spine
- If foot of folded leg slips, hold foot with opposite hand
- Maintain balance by visually focusing on floor about 2 feet away and by using core strength to straighten spine
- Lengthen spine by pretending to touch top of head to ceiling
- Bring hands into prayer
- Breathe, stay in balance, and gradually lift gaze to meet your eyes in mirror
- Engage abdominal muscles and inhale deeply through nose
- Finish pose by doing these:
- Walk hands forward
- Push away from floor
- Straighten standing leg while keeping its knee aligned forward
- Once you’re standing, lower folded leg
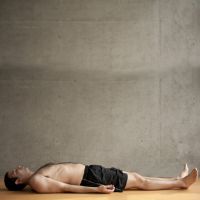 13. Corpse Pose: Savasana
Purposes and Benefits:
- Focuses on breathing
- Maximizes release of tension by completely relaxing entire body
- Optimizes circulation of freshly oxygenated blood to all areas of body
- Slows heart rate and reduces blood pressure
- Lessens fatigue and headache
- Calms mind, reduces insomnia, and improves sleep
- Cures fatigue and jet lag
- Improves absorption of nutrients
- Balances blood pressure, brain waves, and respiratory rate
- Strengthens immune system
How to Do:
- Lie back on floor, touch heels together, and let feet fall sideways
- Relax arms by letting them gently fall to both sides with palms facing up
- Keep eyes open and gaze softly at a spot on ceiling
- Ensure that fingers and toes are relaxed and release any restrictions in throat
- Pull shoulders down and back flatly against floor
- Find a place on floor where body feels completely at ease
- Breathe slowly and deeply, encouraging more tension to leave body with each exhale
- Focus on breathing, especially if mind wanders
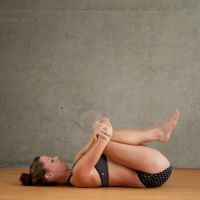 14. Wind-Removing Pose: Pavanamuktasana
Purposes and Benefits:
- Cures and prevents flatulence
- Enhances body’s nutrient absorption by massaging ascending, descending, and transverse colon
- Regulates and normalizes levels of hydrochloric acid in stomach
- Alleviates most chronic abdominal discomforts
- Relieves lower back pain
- Boosts functions of immune system and metabolism by compressing thyroid gland
- Stretches shoulders and entire back side of spine
- Improves flexibility of hip joints
- Firms and tones muscles of thighs, hips, and abdominal wall
- Strengthens biceps and hand muscles
How to Do:
- Fully interlace all 10 fingers and take hold of right leg 2 inches below knee
- Draw right knee out and down toward chest
- Pull right knee to right shoulder
- Keep elbows in close to body and relax shoulders flatly on floor
- Tuck chin into chest and keep left leg firmly on floor; if left calf muscle lifts, flex foot
- Hold pose for 10 seconds and remember to breathe
- While holding pose, allow pose to work into right hip
- Lower right leg
- Repeat above steps using left leg and then relax into left hip
- Raise knees toward chest and grab onto opposite elbows, hooking arms just under knees
- If grabbing elbows isn’t possible, grab forearms, wrists or fingers
- When pulling in knees, look down through diamond shape created between arms and legs
- Work toward getting every vertebra of spine on floor by doing these: Tuck chin to chest to lengthen neck; Flatten shoulders against ground to extend upper spine; Push hips and tailbone down to work lower spine
- Remember to breathe and hold pose for 20 seconds
- Lower both legs slowly
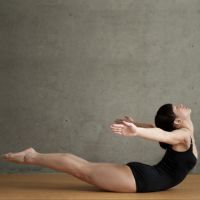
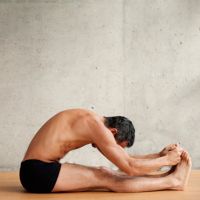 15. Bikram Yoga Sit-Up Pose
Purposes and Benefits:
- Realigns spine and enhances its flexibility
- Increases flexibility of hamstrings
- Massages abdominal organs
- Strengthens and tightens abdominal muscles
- Tones torso
- Energizes body to prepare it for next pose
How to Do:
- Start from Corpse pose (#13)
- Flex toes up toward ceiling
- Bring both arms overhead and cross thumbs
- Inhale as you sit up and exhale as you start diving forward to reach for toes
- Work toward keeping legs on floor
- Grab toes and lay body flat on legs to stretch back of body
- If hamstrings and lower back are too tight, bend knees slightly to grab toes and touch forehead to knees
- Stay motivated even if you think you have no abdominal strength; building strength takes time
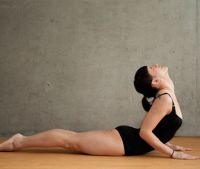 16. Cobra Pose: Bhujangasana
Purposes and Benefits:
- Targets lower back
- Prevents lower back pain
- Helps to cure lumbago, rheumatism, and spinal arthritis
- Relieves menstrual problems, such as backaches, cramps, and irregularity
- Cures loss of appetite
- Aids in correcting posture
- Enhances functioning of liver and spleen
- Boosts concentration
- Increases spinal flexibility and strength
- Invigorates deltoids, trapezius, and triceps
- Massages and tones back muscles
(NOTE: This pose requires 80-20 breathing, whose “How-to-Do” is described first. The “How-to-Do” for the pose is explained immediately after.)
How to Do 80-20 Breathing:
- Begin by taking a full breath as if preparing to head underwater
- As you inhale, lift ribs while engaging and stretching abdominal muscles
- Move into pose while exhaling 20% of air through nose with closed mouth
- Continue to breathe this way: inhale fully and exhale 20% of air while keeping lungs 80% full
How to Do:
- Lie on belly
- Put palms flatly on floor directly underneath shoulders, fingertips in line with tops of shoulders
- Keep legs and feet together and keep them stretched down and back
- Draw shoulders down and keep elbows in close to ribs
- For next step, use strength of spine and legs rather than arms (it’s not a push up)
- Inhale, look up to ceiling, and arch head and torso back until belly button just touches floor.
- Ensure that arms are “L-shaped” at 90 degrees
- Maintain slightly raised gaze and avoid supporting body weight with hands
- To prepare for 80-20 breathing, keep elbows tightly to sides of body and relax face
- Hold pose for 20 seconds while doing 80-20 breathing
- Lower chin to floor
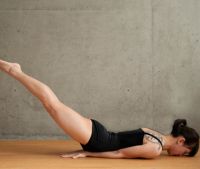 17. Locust Pose: Salabhasana
Purposes and Benefits:
- Includes all benefits of Cobra pose (#16)
- Encourages concentration and perseverance
- Targets upper back
- Helps cure spinal problems including slipped discs, sciatica, and gout
- Cures tennis elbow
- Boosts circulation
- Increases flexibility and tone in spinal muscles
- Firms hips, buttocks, and legs
- Invigorates arm and back muscles
- Strengthens shoulders, pectorals, elbows, wrists, and spine
- Builds core strength
(NOTE: This pose has 2 How to Dos: the first explains doing the pose with 1 leg only, and the second explanation involves both legs.)
How to Do (with 1 leg):
- Lie on belly with chin forward on towel
- Lift hips, turn arms in, and pin arms underneath body
- Move arms underneath body by lifting one hip at a time and rolling to one side
- Keep palms flatly on floor, spread fingers, and point fingers toward knees
- Relax and keep body firm and steady
- Without lifting hips, raise right leg straight up to 45-degrees, and keep left leg relaxed on floor
- Maintain tightened muscles in right leg, point toes, and lock knee
- Touch hipbones to forearms and ensure right hip is not twisting out
- Keep stretching right leg back and hold pose for 10 seconds
- Repeat with left leg
How to do (with both legs):
- Protect neck by tilting head down, tucking chin in, and keeping mouth on towel
- Keep arms underneath body
- Straighten legs, point toes, and lock knees
- Lift legs up away from floor, breathe through nose, and hold pose for 10 seconds
- Strive to lift legs and hips away from floor all the way to belly button
- Use every ounce of strength in legs and abdomen
- Lower both legs without collapsing
- Turn to one side
 18. Full Locust Pose: Poorna Salabhasana
Purposes and Benefits:
- Improves function of liver and spleen
- Increases spinal strength and flexibility
- Firms muscles of thighs, hips, abdomen, and upper arms
- Strengthens deltoids and trapezius
- Includes benefits of Standing Bow-Pulling pose (#6) and Cobra pose (#16)
How to Do:
- Begin by targeting mid-spine
- Lay belly down on floor
- Turn chin in and stretch arms out to sides in line with shoulders
- Face palms down
- Keep legs, knees, and feet together
- Ensure that calves, thighs, and buttocks remain tightened throughout pose
- Exhale completely, then inhale
- Lift arms, legs, chest, head, and torso away from floor
- Keep gaze lifted to direct whole body to lift
- Remember to breathe; a deep inhale will help you lift
- Draw arms back so fingers are in line with top of shoulders and face palms toward floor
- To arch body more: Use back muscles, and maintain straightened arms and legs and keep them engaged. You should also use core strength.
- Set goal to eventually balance body on abdomen
- Hold pose for 10 seconds while doing 80-20 breathing